HOW TO MAKE DIGITAL NEGATIVES FOR CONTACT PRINTING
for making photographic pictures by contact ON FLAT SURFACES like paper and wood: Use silver silver chloride emulsion; its formulas have been given in this book. That liquid light sensitive silver emulsion is of a slow contact speed with the advantage that no darkroom is needed to work it. however, to make pictures you need a negative. This page will tell you how to make it.
ABOUT THE AUTHOR. Saul Bolaños
Has conducted independent research most of his life on applied Visual Art and Science. He is an Authority in Liquid Silver Emulsion Chemistry. An Artist and Inventor of Several Novel Printing Processes, among them Silver Halide Coffee Art. On this page:
1. - how to make excellent digital negatives to contact print on my silver emulsions homemade papers and for all known alternative photography processes.
2. - how to make a contact printer. I tested more than 20 photo editing programs (some very expensive) and the best I found is "photoScape" which is totally free with no adware. you can download this program for free, just search for "Photoscape". after many trials I found how to use its excellent features in order to make good dense black and white negatives with a long scale from color digital positives taken in the camera or any other color digital file as well as from scanned black & white silver negatives on celluloid or black & white silver positives on paper.
all computer monitor screens without exceptions are deceptive, they show great density on the negatives being displayed, but this density is false, on printing; the negative will have very poor density resulting in prints of very low contrast. follow directions below and your problems for making negatives for all alternative processes are solved.
these Directions were worked out for making great negatives for printing on My silver based PHOTOGRAPHIC EMULSIONS with only a few variations in parameters of steps given below.
negative density can be adjusted for any photographic printing process like: "bromoil, kallitype, cyanotypes or blue print process, carbon process, platinotype, palladiotype, albumen process, plain salted paper, carbro, gum bichromate printing, dusting on, etc. after making the adjustments as shown below, if the final to be printed negative is going to be small, say, 4x5 inches, the original file can be small from 500 to 1000 kb (0.5 to 1.0 Mb) Save it in "JPG" format , choose " maximum quality " in the options menu.
HOW TO MAKE DIGITAL NEGATIVES SECOND METHOD
one of the methods i found and teach my students is very simple.
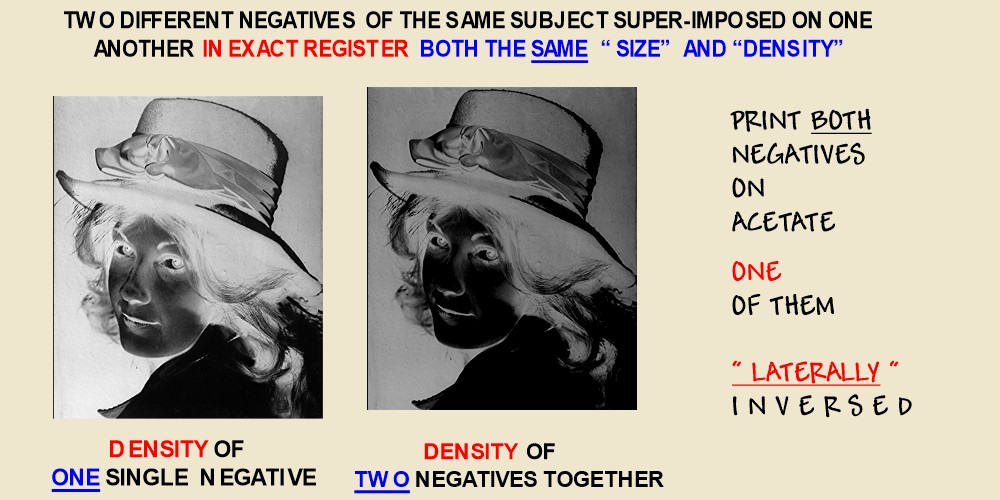
using inkjet computer ink, on the highest resolution and quality of the printer being used, (usually photo quality), print two "identical" black and white negatives on acetate of the same subject and of the same size; (printed with black inkjet ink )
but print one of the negatives only, laterally reversed so they can coincide with each other when (on a light table) are registered exactly in contact with each other and each facing the side of the printed ink (for maximum sharpness),
that is after when "one" is superimposed on the "other" on both the outside layer will be left the acetate. the printed ink will be left in the inside. density gain is 100% and retaining the original tone scale and also increasing greatly the contrast of the final print if still more density is wanted, print the grays of the black and white negative with color ink instead of using only the black ink.
HOW TO MAKE a CONTACT PRINTER
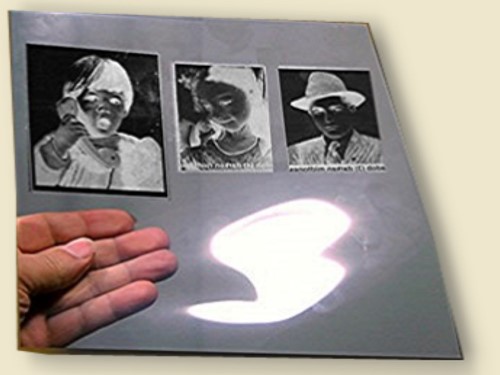
for alternative photography processes tape the digital negative 1) by means of black adhesive tape 2) to a piece of thin window glass size 4x5 inches: 3)
make sure the "ink side" of the negative contacts the glass, in this way the negative will be protected from damage and will give thousands of impressions.
now with adhesive tape 4) unite the glass bearing the taped negative to a piece of thin plywood size: 5x6 inches, shown as 5) tape these in a manner that you can lift and lower the glass to firmly contact the negative to the photographic paper 6) just before light exposure.
THICK DIGITAL NEGATIVES
(or silver negatives) required more exposure time than thinner ones, the exact tone and particularly the contrast of the developed picture will be also influenced by the optical opacity of the negative.
operate away from strong daylight sources. you can work at night under normal room lights. daylight fluorescent tubes are very active. do not expose paper unnecessarily too long or too close to these light sources and protect or shade the paper from them.
CONTACT
COSTA RICA © 2025, saul bolaños
CAFEDESAUL@GMAIL.COM
STEP 7
Print the negative on clear transparent plastic ink-jet acetate
these come letter size with an ink-jet receptor coating. to do this command your printer to use black ink and the highest resolution usually "photo quality".
print the negative the same size as the final print will be.
it is a contact printing process. Use "black" ink in your printer
STEP 1
sharpen the pixels
next to the "sharpen" tab.
click on the "see arrow" tab .
On pop up menu
choose a value of: 13
STEP 2
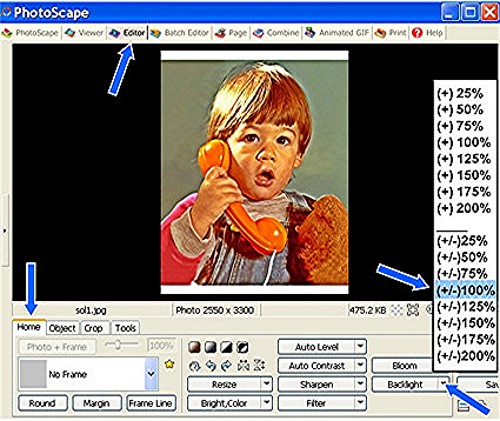
add light to the shadows and middle tones next to the
"backlight" tab.
click on the arrow.
On pop up menu choose: (+/-) 100%.
this filter is wonderful
it evens out all light values.
it is a must.
STEP 3
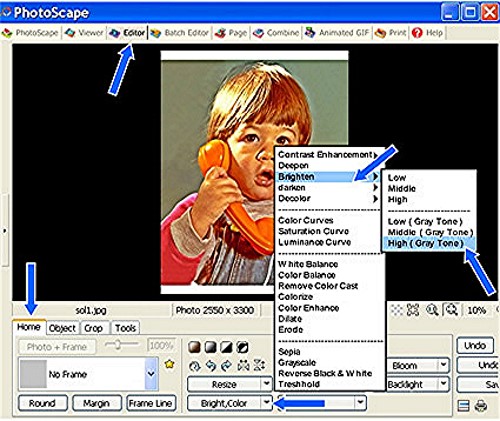
intensify the middle tones
next to the "bright,Color" tab. click on the "arrow" tab as shown above. On pop up menu first follow with pointer to "Brighten" and then move it to choose: "high (gray tone)" this filter makes the positive much brighter as it intensifies the middle tones.
This step is applied: "Two Consecutive Times." apply once and then apply again immediately after. Without this step the final negative will have very poor density.
For softer lower contrast effects on the final print apply this filter only once. generally for all my silver papers it should be applied twice as given.
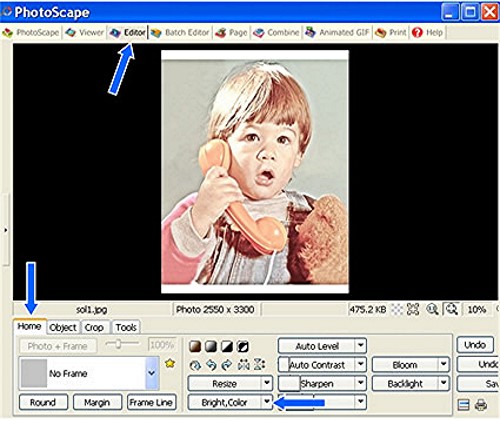
LEFT COLOR POSITIVE
AFTER APPLYING FILTER
OF STEP 3,
" TWICE "
STEP 4
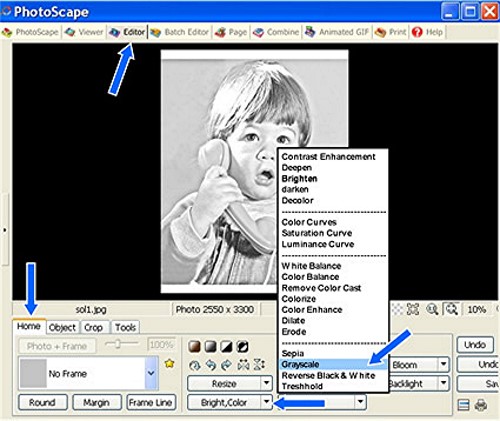
turn the colors into grayscale
next to the "bright,Color" tab.
click on the "arrow" tab as shown left.
On pop up menu choose:
"gray scale".
STEP 5:
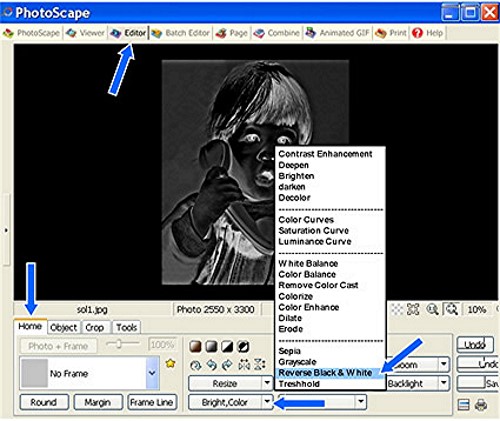
turn the grayscale positive
into a negative
do this in the next to the
"bright,Color" tab.
click on the "arrow" tab as shown.
On pop up menu choose:
"reverse black & white".
STEP 6:
save the file to a folder in your computer, to do this;
-press the "SAVE" tab to the right on the bottom of the screen and in the pop up menu choose:
"save as" give a file a name, - use a .jpg file extension.
if very large negatives are to be printed (letter size) save as on windows operating systems as a "BMP" extension