CHAPTER 6
COATING GLASS PLATES
AND PAPER WITH SILVER EMULSION
instructions on How to coat glass plates to make your own photographic negative film given below apply also on coating glass with liquid light sensitive emulsion for positive work with due regards for varying of glass size, and coating weight of silver per glass area. It is to be understood that the same principles to be explained here can be applied to any other size of glass plates to make positives or negative images.
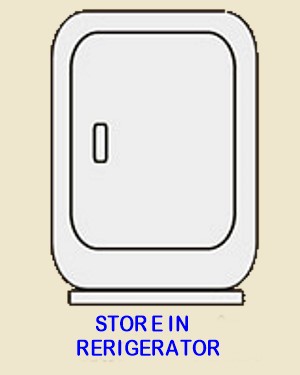
KEEP UNCOATEDLIQUID PHOTOGRAPHIC EMULSION UNDER REFRIGERATION
 If the 2 ml 10 % alcoholic solution of salicylic acid was added to the finished emulsion containing 40 grms gelatine (dry weight) as given for the formula # 1 in chapter 5, Uncoated humid Emulsion should keep more than 6 months under refrigeration at 5c (23 f) or under, without mould appearing.
At 5c or under, emulsion will not ripen rapidly, that is, the silver crystal will not grow chemical activity is retarded at that temperature. It should then maintain its original speed and contrast for 6 months or so as long as it is not heated or left uncoated out at room temp for many days .
Do not heat it again or leave it out of the fridge for long times unless all of it is going to be coated .
Note that once coated, emulsion will loose humidity on drying, and it will not spoil or biodegrade because it has lost most of its water. Gelatine emulsion, once coated will retain, on drying, only about 10% humidity which is normal. Before Coating Solid Emulsion After chilling the “Finished” ripened emulsion for a few hours (or days or weeks) Take out of the refrigerator, it will be a solid milky white mass. In darkroom by red or orange light Scoop out with a spoon only the portion that is going to be coated or tested.
Melt this portion for use only. It is preferable to leave the rest of the stock uncoated emulsion undisturbed and unheated, and to return it inside its light proof container to the refrigerator as soon as possible where uncoated will keep ready to be used again for a long time.
If left at room temp it will continue to gain speed, and it will eventually fog, depending on its degree of sensitivity. Fast negative emulsions may fog in only hours or days at room temp in humid form. But once coated, on loosing its water, chemical changes are enormously retarded, and will keep for months or years depending on storing conditions. Left over, melted by heat, but uncoated emulsion should not be placed back together with un-heated stock emulsion because it this portion was heated too long or too hot ; it may have gained more speed than the unheated portions.
Coat any left over heated emulsion on paper and use it for exposure test strips instead.Thinner: for coating large areas, dilute emulsion or thin down with 5-10 % of water to facilitate spreading.
Ethyl alcol should not be above 5% ( 5 ml x 100 ml liquid emulsion) when coating impervious non absorbent surfaces like glass or tiles. It may leave reticulation marks on the surface of the layer.
EFECTS OF ETHYL ALCOHOL
(ethanol)
lIQUID EMULSIONS MAY BE DOSED WITH GREAT AMOUNTS OF ALCOHOL UP TO 20-40%, to facilitate rapid drying. But "all of it" must be coated soon after adding the alcohol, because if left uncoated in liquid form, emulsion will gain speed rapidly and soon develope fog particularly if it is a rapid type of emulsion.
Liquid uncoated Emulsions, or gelatine solutions with 20% ethyl alcohol or above do not biodegrade and do not need antiseptics. They may be kept at room temp for months.
(but rapid emulsions will gain more speed and eventually fog much sooner than with only 5% ethyl alcohol)
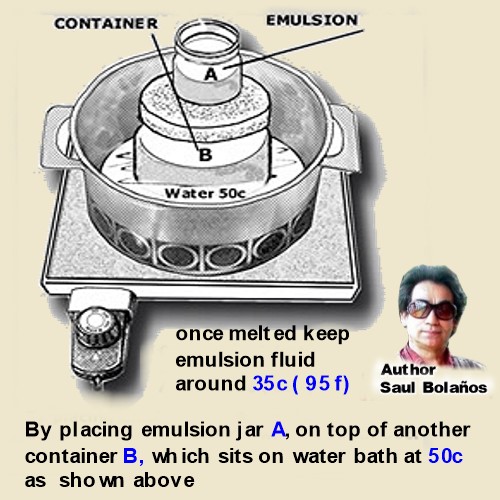 Keep Emulsion Jar in Water Bath Just Warm Enough For Coating To Keep Emulsion Jar in Water Bath Just Warm Enough For Coating, Sit a larger dish inside water bath at 50c (122f) and on top of it, place the already liquefied emulsion jar. as shown in figure to the left.
In this way emulsion will keep just warm enough to maintain fluid for coating at around 30-35c (86-95 f). with such a gentle heat, emulsion will not ripening too much and it will keep it from developing fog.
This is a capital importance for ULTRA rapid negative emulsions GIVEN IN THIS BOOK , at 35c ( 95 f) as long as the same portion of emulsion is not heated more than 4 hours, speed will not change and fog can be avoided.
To insure the avoidance of fog then, melt just enough emulsion for the job and coat it before 4 hours. This method has the added advantage that the pre-regulated thermostat settings of 50c, of the heating plate will not be disturbed, to continue making more emulsions without the trouble of regulating the heat again Use any of the emulsions described here to coat the glass.
Expose your hand made negative film coated on 35mm glass plates in camera.
Cut thinnest window glass in sizes of 35 x 50mm. In the darkroom coat that size of plate with 0.75 ml of liquid silver photo emulsion. Dry and expose plates in any old 35mm Single Lense Reflex camera as it will be described later.
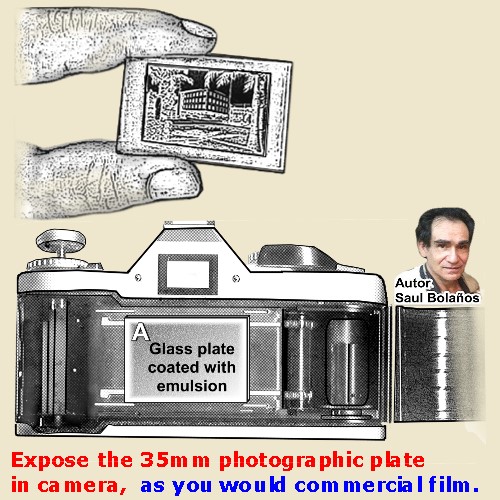 Cut or have cut pieces of the thinnest window glass (about 2mm thick) into an exact size of 35 x 50 mm plates shown as B in figure. This size will fit inside all SLR 35mm cameras.
File the edges with a stone (protect your eyes) and wash them with detergent before applying the chrome alum sub Next, by normal room lights, to sub them with chrome alum substrate solution they do not have to be dried, enough to stand them to drain after washing.
Handle plate by the edges and cover them with the chrome alum substrate solution # 4 using a 1 ml dropper as shown, drain excess (it can be used again) and stand the coated plate in the wood plate holder shown as A in figure which is made with wood strips. Insert ordinary staples at the foot shown as C so the plates will no slip off the wood rack during transportation and use.
SUBBING THE GLASS
PLATES WITH CHROME ALUM
SUB FOR GLASS AND GLAZED CERAMICS.
Chrome alum is a gelatine hardener that makes emulsion stick to glass, preventing damage during processing. the formula below which I worked out back in 1980;
is unrivalled for the purpose and keeps a lifetime. Chrome alum is not at this time listed as particularly toxic, but handle with discretion.
FORMULA:
Distilled water 60 ml
ethyl alcohol 40 ml
glacial acetic acid 0.25 ml
flavorless food gelatine 0.5 grams
5 % chrome alum sol 2 ml
If in leaf form, cut gelatine in small pieces. Place with rest of mixture inside a glass jar with lid.
Leave soaking for 30min, melt in a water bath at 50c, for 15-30 min. Stir occasionally until completely dissolved.
Filter through paper, Use top part of solution if solids sediment over the years. For larger quantities keep same proportions of ingredients. To make a 5% chrome alum solution: dissolve 5 grams of it in 100 ml of water. ( in a well stoppered bottle it keeps a lifetime)
Let the sub on plates dry naturally or air dry it.
(Now to recognize it -mark with an “x “ the side of glass not subbed )
The plates are now ready to be made light sensitive with the emulsions
that you have made with my formulas that i gave you in this book.
 Prepare Coating Table
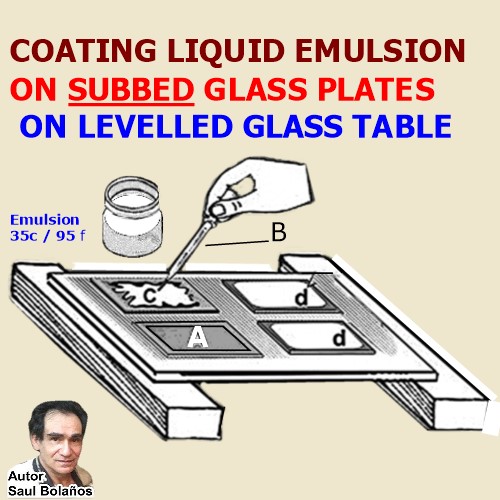
For coating glass plates with photo emulsion; prepare a leveled glass table as shown in figure where on two wood strips AA, a window glass plate, B is leveled with the aid of a spirit leveler C. Insert pieces of carton D under wood trips to raise or lower glass B until it is perfectly leveled.
The liquid coated emulsion, due to the leveled plane will set into a solid with a layer of uniform thickness. The glass B can be a size of 8x10 inches (20x25cm) for holding 8 to 10 - 35 x 50mm negative glass plates.
In darkroom position red or orange safelight in a manner that you can see the coating table. Place a few uncoated subbed glass plates on the leveled glass shown as A in figure with the subbed side facing up.
with photo emulsion liquefied at 30-35c / 86- 95f; with a 1 ml dropper shown as B draw 0.75 ml of liquid emulsion and gently discharge it on center of glass plate as shown in C and spread it with dropper or fingers so it covers all its surface.
Sweep any bubbles formed to the edge of the plate. Leave the coated plates shown as D, on the leveled table until
emulsion sets into a stiff immobile solid. This make take 1 to 20 minutes at 18-25c / 64-77 f (depending on room temperature) During this time, block safe light from hitting the coated plates directly or just turn it off.
 If Room temperature is at 18c / 64 f or below, the plates may have to be previously heated to body temperature just before coating to prevent emulsion from setting into a solid prematurely.
On the contrary If room temperature is too hot 26c / 79f or above; It will take a long time for emulsion to set, In such case wait until night time when temperature drops. Alternatively on hot weather the supporting leveled glass plate, may have to be chilled by dipping it on ice water 10 minutes or so, and then taking out and placing it on top of the previously leveled wood strips.
All of this has to be done rapidly. Note that Extra Rapid negative emulsions given in this book (above 25 ISO) have very large heavy silver particles, and it must not remain in liquid phase too long,
otherwise grains will sink to bottom of glass leaving surface lacking in silver, this reduces maximum blacks speed and density.
Make a simple test., drop a small pool (about 1ml) of liquid emulsion on the leveled glass, (put away emulsion jar safely inside its light proof container)
Turn normal room lights on and observe taking the time how long it takes the pool of emulsion to solidify at such room temperature. Setting times of 1 to 10 minutes are practical in which no further precautionary measures need to be taken. For rapid negative emulsions procure a setting time of no more than 5 minutes.

SUPPRESSING BUBBLES
Photo emulsion made as instructed here: should be dosed with 5ml of ethyl alcohol per every 100 ml of emulsion and filtered,
after which emulsion should not be shaken or stirred violently. Melt chilled emulsion portions gently.
Follow this directions and bubbles are completely suppressed.
After your coated home made photo emulsion has set into a firm solid on the glass plate; have a razor blade nearby to lift it off the coating table in case it has stuck to the leveled glass due to some emulsion spilling on the back of the coated plate.
Drying 35mm Glass Negative Plates
Hold coated plate firmly (slippery) when you do this. Handle coated plates wet or dry only by the edges.
Wipe off any spilling on the back of the coated plate using a moist sponge. To dry them, stand them on th e wood plate holder as shown in figure
and position the plate holder in front of a current of cold air coming from a fan.
All small plates size 35 x 50mm should be dry to the touch in 1.5 to 3 hours. After your coated home made photo emulsion has set into a firm solid on the glass plate; have a razor blade nearby to lift it off the coating table in case it has stuck to the leveled glass due to some emulsion spilling on the back of the coated plate.
Hold coated plate firmly (slippery) when you do this. Handle coated plates wet or dry only by the edges. Wipe off any spilling on the back of the coated plate using a moist sponge. To dry them, stand them on the wood plate holder as shown in figure and position the plate holder in front of a current of cold air coming from a fan.
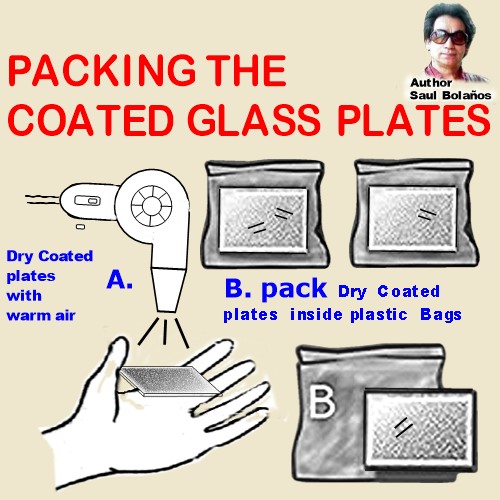
Pack The Plates
Following cold air drying, if coated emulsion feels a little sticky to the touch, It is due to emulsion attracting humidity from air, this only occurs when emulsion is not washed, and the hygroscopic sodium or potassium nitrate attracts the humidity. But even unwashed emulsion can be used, if Before packing, warm air is applied to emulsion on the plate with blow gun as shown as A in fig, (care with light flash on igniting gun) until coat no longer feels sticky.
and while the plate is still warm; pack each plate or object immediately inside plastic bag shown as B (or wrap in cellophane) so it will not absorb more humidity from air. If packed without heating, plate coated with un-washed emulsion will stick to plastic packing material)
Pack each coated object or plate individually as seen in B (fig) so they will not damage each other or stick together. Store packed plates in total darkness.
Under refrigeration at 5c / 41 f or under, they will keep for months or years without change of speed or fog.
(if emulsion was made right) Note that washed emulsions keep better. Emulsion made by the ammonia process must be washed to get rid of the ammonia which would cause fog and stains, Neutral emulsions can be left unwashed, but as said, they will always be sticky, until after processing the plate, then the nitrates will be washed out of the emulsion gelatine, giving a perfectly non sticky plate on drying.
SHELF LIFE OF COATED MATERIAL
Pure chemically inert coated material like watercolor paper or glass, will retain same speed without fog for a long time: 60 days to 3 years or more, even without refrigeration. but much depends of original speed of the silver emulsion, and all also according to storing conditions, and the amount of time and temperature the fresh liquid emulsion was heated before coating; on storage, it may gain twice the speed in a later date, and finally it will develop Age fog, giving impure whites. For consistency it is advised to process coated material as soon as possible.
Less than 4 weeks on chemically active surfaces like materials painted with “any type” of commercial paints, particularly , oil varnishes or paints with lasting gases wich will act on the silver grain especially if this is large like in rapid negative emulsions. Coated material frozen below 0 c, will not develop fog or change speed. just refrigerated at 5-10c coated photographic emulsion material will keep at least 10 times longer than at room temperature above 15c.
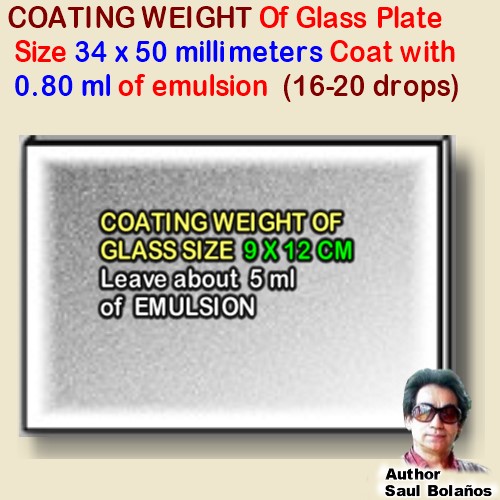
Coating Weight of Emulsion on Glass
Glass Plate Size 34 x 50 millimeters
Should be Coated with 0.80 ml of emulsion
Leave about 5 ml of emulsion on a plate size: 9 x 12 cm (about 100 cm2)
Use this ratio and proportion for any other size. 250 ml ( half pint ) of emulsion should coat about 50 plates size: 9x12 cm.
Conditions Affecting Emulsion Speed & Contrast
Poor Contrast can be caused by not enough agitation or temperatures too high during precipitation and ripening of the emulsion, Also by coating emulsion too thin, by overworked developer, stale coated material, emulsion overheated or left too long out of refrigerator. Over exposure during printing of the negative.
Speed Changes and Contrast
Maximum Blacks May depend on emulsion thickness. FOR EXAMPLE ON PAPER: two thin brush coats make good pictures as long as they cover the surface evenly.
They yield less Speed and contrast however than thicker coats made for example with 4 thin coats ( instead of 2 ) There is a limit where thicker coats will not yield denser blacks or more speed and contrast.
After this limit has been reached, further coats will make the layer harder to fix , the image may not have optimum sharpness and the whites may be less pure.
Expose Plates
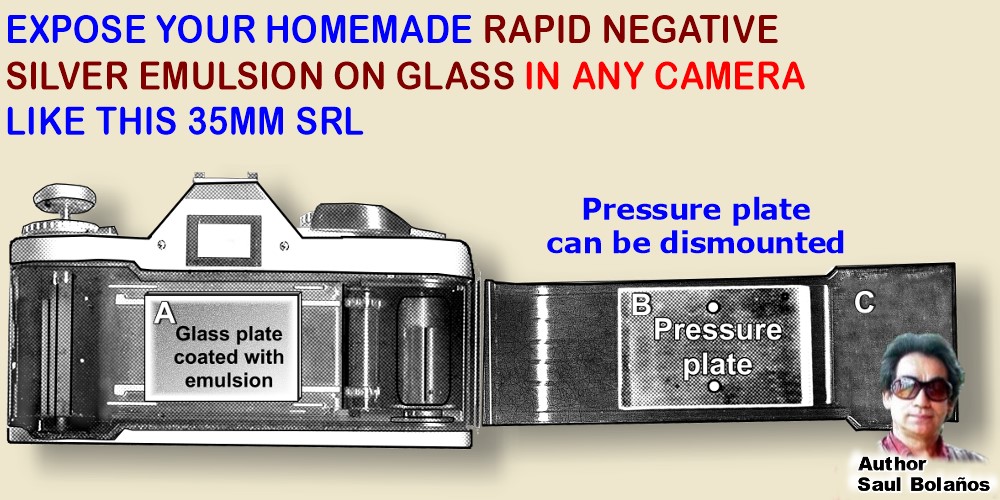
Expose your hand made photographic plates in a 35mm single lens reflex (SLR) camera by mounting ( in the darkroom) on the focal plane of the camera, the light sensitive 35mm glass plate with the emulsion side toward the lens, shown as A in figure. The pressure plate shown as B can be dismounted on all SLR cameras,
in cases where the door of the camera refuses to close easily due to thickness of glass plate. This is usually not necessary, but if a great number of home made photo plates are going to be exposed regularly it is recommended to dismount it. The pressure plate can later be remounted on its original position easily. Close camera and take out of darkroom to make the exposure. After exposure return to dark room and process the plate.
To make the exposure
Compose the picture using view finder and focus on the subject in the normal manner. Use built in or hand held light meter to measure light falling and convert the exposure given.
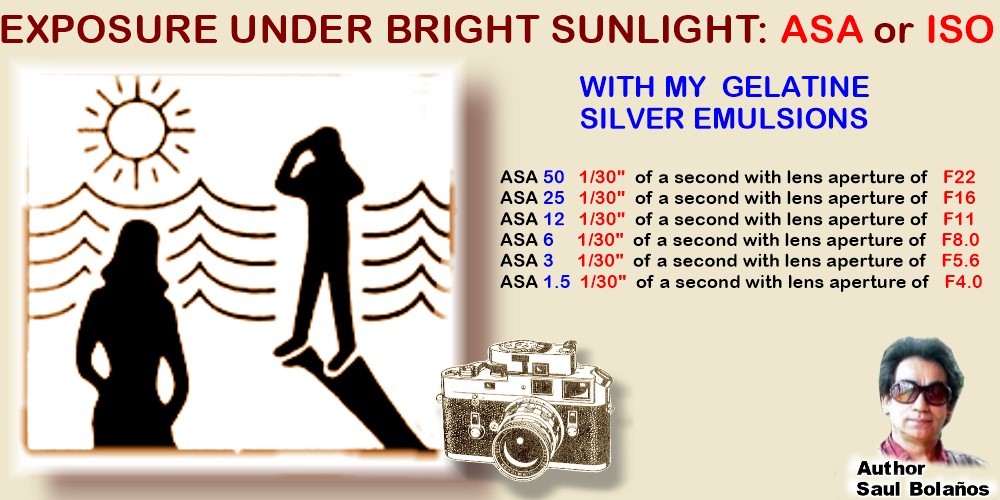
EXPOSURE UNDER BRIGHT SUNLIGHT: ASA or ISO WITH MY GELATINE SILVER EMULSIONS
ASA 50 1/30" of a second with lens aperture of F22 ASA 25 1/30" of a second with lens aperture of F16 ASA 12 1/30"
of a second with lens aperture of F11
ASA 6 1/30" of a second with lens aperture of F8.0 ASA 3 1/30" of a second with lens aperture of F5.6 ASA 1.5 1/30"
of a second with lens aperture of F4.0
TO MAKE TIME EXPOSURES
Sit camera on a firm object or use a tripod, set the exposure speed to "bulb" press shutter and keep it press for all of the time of the exposure, then release it to close lens and to end exposure time. Take camera inside darkroom to develop and process the negative or to reload camera with another photo negative plate.
The silver halide emulsions that you have made for negative work , has more speed or light sensitivity than that of an average wet collodion plate which was about ASA 0.25,
Wet collodion dominated portrait photography for about 30 years. The average exterior daylight exposure under bright sunlight for wet collodion plates (between 1855 to 1885) working at a lens aperture of f 8, was 5 seconds. In the shade or inside studio, exposure was longer, about 10 to 20 seconds. Portraits of people made with 5 seconds exposure are perfectly possible and very comfortably made.
Today with the rapid lenses and your photo emulsion made with the my formulas,
Camera exposures can be made as short as 1/30 of a second and a lense aperture of f 5.6 assuming emulsion sensitivity is ASA 3, as shown in Table above where 1 single exposure time (1/30 sec) varying only the lense aperture and with different emulsion speeds is given. Table shows that with ISO or ASA 12 ( 200 % more speed than ASA 3) lens can be closed down 2 stops from f 5.6 to f 11. Front lit subjects, cloudless sky / bright sunlight.
Processing The Negative
Following exposure in the camera, the exposed plates can be stored for a few days before developing. But is recommended to develop as soon as possible. Steps below are in Darkroom under red light illumination.
1. DEVELOP
For 1.5- 2min at 20-23c / 68-73f with cont. agitation in a paper developer like dektol ( D72 see) diluted with 2 parts water. -Or a Fine Grain D 76 type or D72 boric below.
2. STOP BATH
Transfer to a 2.5 % acetic acid stop bath for 30 seconds
3. FIX
for 10 minutes In a hardening fixer with frequent agitation. For Archival Permanency for negative or positive work: 1. first 5 minutes fixing bath can be used (but not overworked) 2. but second 5 minutes bath must be fresh and unused.
4. WASH
15 - 30 minutes in gently running water.
5. DRY
cover negative plate with ethyl alcohol 1:1 for 2-3 minutes, drain and stand upright to dry naturally or under a current of cold air. If tap water has too much calcium, (white deposits which form on negative) distilled or rain water may have to be used for the last rinsing.
PAPER DEVELOPER D 72
This developer is identical a kodak’s Dektol, it can also substitute Ilford’s Bromophen or Agfa’s Neutol paper developers.
Water about 50c ( 125 f) 500 ml
Metol (or kodak’s Elon) 3 grams
sodium sulphite anhydrous 45 grams
Hydroquinone 12 grams
sodium carbonate monohydrated 80 grams
( If anhydrous use 67 grams)
Potassium bromide 2 grams
add cold water to make total 1000 ml
For use, dilute with 2 parts water, develop papers for 1 - 1 1/2 minutes at 20c ( 68 f)
D72 Boric
Full Emulsion Speed Clean Plate Negative developer
D72 as above 100 ml
water 100 m l
5 % boric acid 100 ml
Develop plate with continuous agitation for no more than 5 min 23c. or 10 min at 20c (68f) Full emulsion speed , no fog (almost clear glass) good contrast and density.
 PRINTING THE NEGATIVE
Print your negative photographic plate by projecting the negative image onto the light sensitive material. This printing by enlarging is done in the normal photographic manner in an ordinary photo enlarger as shown in figure where the photo negative B inserted under the lamp A is projected at any desired size by means of lens C onto the coated light sensitive material shown as D.
The light sensitive material may be made by coating any material or object with the same liquid emulsion you have made which works fine as a negative or positive emulsion. An invaluable tool in alternative photography work.
you can make pictures on plates, stones, eggs, wood, metal, plastics, cloth, canvas, sea shells, etc. The possibilities are endless. This alternative photographic work is impossible to create by any other media.
Digital photography can not come close to this versatility. Process the exposed positive material in the same manner as given for processing the negative.
Approximate Enlarging Exposures for Positive Work
using the same hand made photo emulsion you have made for negative work: ammoniacal positive emulsion # 1, formula as given earlier.
With a 50w ordinary tungsten house hold lamp, with enlarging lens at f 5.6 and a 2x magnification:
about 5-10 seconds is a good starting trial exposure. .
 How To coat Paper
To get the most brilliant blacks and to save on emulsion, Fiber paper must be coated first with a sub to fill the pores, if not,
the silver will sink in fibers resulting in lower contrast. An excellent sub is my CLEAR SUB #1,
Apply with a brush the following clear colorless gelatin sub or pre coat, put in a glass jar the following mixture:
this is a 10% Plain Gelatin Solution
water......................................................100 ml
gelatin (flavorless and colorless)
powder or in leaf form........................10 grams
let the gelatin swell in the water for at least 15 minutes, agitate occasionally. then dissolve it by placing the jar in a hot water bath at 45-50c.
It melts in about 15 minutes. Filter through a fine mesh strainer to get rid of the bubbles.
or better, through a double fold of silk or polyester women stockings placed at the end of a funnel's mouth.
Do not shake too much afterwards to avoid forming too many bubbles, if you do, you may have to filter it again.
If you use sheet gelatin you will have no bubbles. You can apply the warm gelatin now to wood or paper. Brush the mixture on the wood while it is still melted.
 Brush first from top to bottom overlapping the brush strokes. Then from left to right and finally diagonally. Stop when you see an even shiny coat. Stand the wood to dry when the coated gel has set and is no longer runny . in cold weather you must act quickly before the gel sets into a stiff jelly. Keep the gel jar warm in the hot water bath. in extreme cold whether you may have to heat the wood to human body temperature to avoid premature setting. (heat to 40 -50c)
 Give wood or paper a second coat:
exactly as the first and let the wood or paper dry. Learn and feel how the gelatin solution spreads with close attention to the gelatin solution properties, the above is a IO % plain gelatin solution. Its viscosity is exactly what you will have in liquid emulsion, and also its setting properties. When you finish coating the wood or paper place the gelatin solution in the refrigerator, where it will keep in good condition for a week or so.
If you see mould growing on its surface (dark blue round spots) it means it has started to biodegrade. Scrape off the bad part and use the bottom only if has the power to jellify still. If the top part has begun to liquefy even in the refrigerator , bad news. Throw it away. To keep it from spoiling many weeks,
Prepare a 10% alcoholic solution of salicylic acid
Salicylic Acid.............................. 10 grams
ethyl alcohol............................... 100 ml
of this, add to the above 100 ml of gelatin solution: 3ml.
Under normal room lights, Apply a first coat evenly with a brush. Dry, apply a second coat, dry and the third coat and dry again. The brush should have soft hairs and any metal parts should be covered with tape to avoid unwanted chemical interactions. Nothing easier than to coat paper, move brush from top to bottom, then from left to right, and finally across right angles until it is covered with an even gloss of either sub or liquid emulsion. For important work use only
 WATERCOLOR ( 100% cotton fiber) PAPER. which is available in artist's supply stores in sheets sizes 11x15, 18x24, 22x32 inches an more. Also in rolls as wide as 50 inches by 10 yards long.
It is also Available in different finishes and textures like ROUGH or SMOOTH (cold pressed) which is the one to use to get maximum detail in the image when contact printing from negatives. Weights available: thick and heavy 140 lbs - 300 g/m and a thinner 90 lbs - 185 g/m. Any weight of these papers can stand days of washing without distortion or tearing.
Their permanency is well established as Over 500 years.
They were first manufactured and used in Europe before Columbus discovered America. All of these 100% cotton fiber papers have a great " Body " which will dry flat without curling. Most other papers will have to be given counter coats of
clear sub no: 1 on the back to suppress the tendency of curling. Watercolor 100 % cotton fiber Paper can be coated directly with silver emulsion, but I prefer to give them a couple coats of clear sub no: 1 to save on emulsion and keep maximum image details above the surface of the paper.
 I usually hand coat and dry 100 sheets 11x15 in. in a few hours. I start coating in the evening each paper is hanged to dry naturally in the darkroom. After first coat of emulsion,
 each sheet is hanged while other sheets are being coated, By the time sheet number 100 is coated with its first coat, the emulsion coat on sheet number 1 is dry or almost dry, and ready to take a second emulsion coat. A third emulsion coat is given if necessary.
All the coated sheets dry naturally before daylight comes, they are then gathered and packed emulsion to emulsion inside plastic bags which are sealed to block all entrance of air,
light and humidity. If the paper is going to be used in the next few months, It is kept at room temperature.
If no it is stored in the refrigerator under 10c,
where I know they will keep in good condition for many years because: 1) the paper is pure 2) they were not fogged by safelight 3) they were FULLY DRY when they were packed 4)
they were sealed inside plastic bags to keep them from exposure to light, air, and humidity.
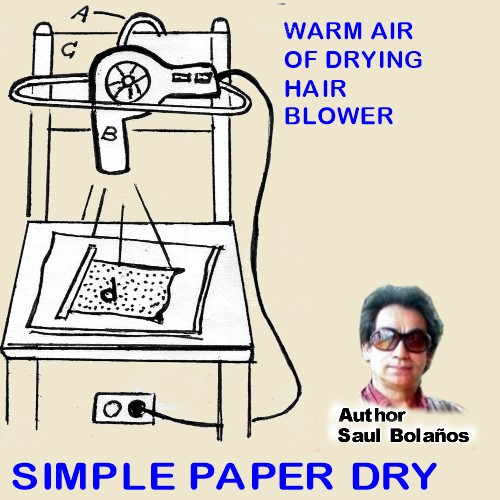 Efficient is the drying arrangement As shown in figure . A. is a wire coat hanger, bent and reshaped in any convenient manner to hold the hair dryer B. and to hang at the same time from the chair C.
 12 to 20 inches directly below the end of the barrel of hair blower B. the recently coated paper D. is laid down. The current of cool air coming from the air blower or hair dryer will set the gelatine emulsion in a manner that after 5-10 minutes,
(although not completely dried) it will be firm enough to take a second coat of liquid silver emulsion. This second coat after taking another 5 minutes of blown cool air, will be firm enough to take even a third coat of liquid emulsion. (only necessary with very absorbent papers)
This second, third, or final emulsion coat submitted to the current of blown air will dry in about 10 to 15 minutes. When the gelatin silver emulsion coating feels dried to the touch, the paper may be stored away or processed immediately as when testing emulsion ripening.
On materials other than fiber paper,
It may be necessary to wait 24 hours to process.
(better adhesion)
Speed and contrast on some fiber papers is stabilized only after the emulsion has dried, plus 24 hours.
 WITH MY SILVER HALIDE EMULSIONS .
Coating Of Glass and Tile
with silver Based Liquid Photo Emulsion:
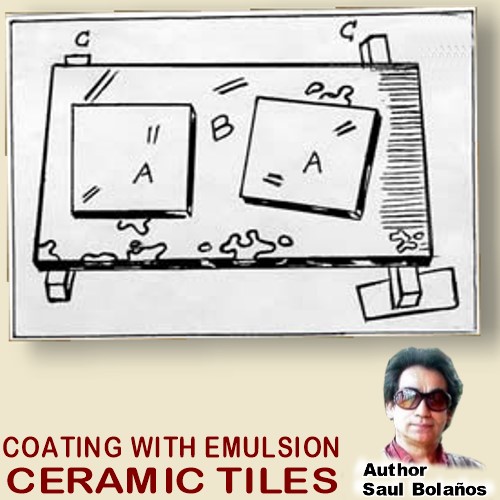
A large glass plate B in fig ( sat on a couple of wood bars CC) is first leveled carefully using a spirit leveler. any liquid place on this leveled plane will equalize itself (as long it is in liquid mobile phase) giving a layer of even thickness all throughout its body.
For rapid setting of the gelatin emulsion, the leveled plate is chilled with ice water or any other means. The cold from the plate will transfer to the liquid gelatin in the emulsion, coagulating it rapidly (in 5 minutes for glass and 10 minutes for the thicker tile shown as A A in fig.
Once set the gelatin will not run, it has been immobilized, so the coated glass or tile can be stood to dry. Drying in a cool place of course, (below melting point of gelatin) If drying with air from a fan, air should not be over 26c for the first hour.
by the third hour the coating should be almost dried and warm air 30-35c can be applied. Drying Coated Silver Emulsions in Less than 12 hours is of the greatest importance.
Gelatin is a foodstuff, if left humid (especially in hot weather) exposed to the air in a thin layer, it will begin to spoil.
Below is a short list of what happens to silver in a little degraded vehicle:
0. the gelatin comes off during processing even with a good sub.
1. the dried coated emulsion looses contrast.
2. the dried coated emulsion develops age fog rapidly.
3. the dried coated emulsion changes speed.
4. the dried coated emulsion develops mould during storage.
Silver Prints On Glazed Ceramics
Tile Coated With Silver extra slow silver Chloride emulsion ( see chapter 9) and Processed 25 Years ago. it was given no varnish overcoat whatsoever. Silver print is a 1.5 x enlargement from a 6x7 bw negative Liquid silver emulsion type: Pure Clean silver chloride. 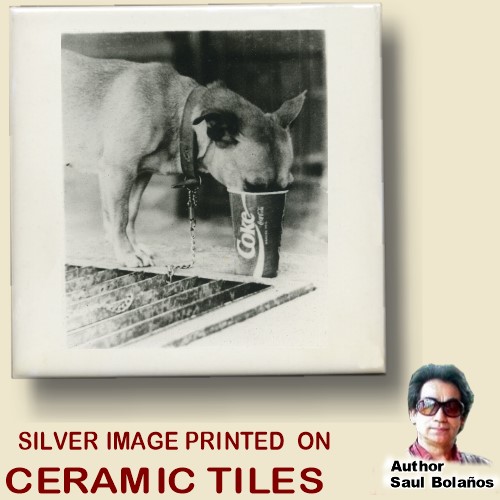 exposure time: 90 seconds at F4.0 Light source: 100w ordinary incandescent bulb.
DATA: Silver image was produced Directly on a commercial 6x6 inches glazed ceramic tile which comes with a glaze made opaque with titanium oxide, a high temperature pigment that yields an extraordinary pure white color.
5 ml of the silver melted liquid photo emulsion was poured gently on the center of the 6x6 in. tile (not thrown or splashed on it)
and the warm pool of emulsion had spread to all four edges of the tile using my finger.
(emulsion is non toxic) and the tile was placed on top of the chilled and leveled plate where the emulsion was set.
Coating 20 tiles takes less than 10 minutes with a little practice.
Needless to say, before coating the silver emulsion the tile, glass,
or any other glazed ceramic object must first receive a first class substrate
( sub chrome alum above) or pre coat to hold the gelatin silver emulsion in place during processing and washing.
 Archival Silver Images On Fired Porcelain
you are seeing works that are more than 40 Years old.
The problem I had which is rare and only happens with fired porcelain which is translucent (not with glazed tiles) to Coat the Porcelain plates (shown) with liquid silver emulsion was twofold.
First: Vitrified porcelain is translucent, when a projected image from an enlarger is thrown on it, It gives a diffused unsharp image. Problem was solved by including an opaque body in the emulsion to act as light receptor, very much like fiber paper is, hence, the corn starch in the composition below. With CORN STARCH in the emulsion, the finished image takes water color very easy, and can be colored also with pencils, just like paper.
Second: These beautiful Plates are hand made, since their surface is not flat and its surface is uneven all over, they could not be coated as easy as the tile above. If I did so, It would be disastrous. If Instead I Flowed the emulsion on the plate and after covering its whole surface, I let the excess drip on one end and afterwards stand it erect to dry, that also would be catastrophic.
In the first case, the thicker pools of silver halide left in the deeper parts of the surface would never completely fix, so In a time span of 3 months to 5 years, yellow, orange, or sepia stains along with purple patches would appear in the image. (residual light sensitive silver halide left in the image that continues to darken at a pace proportional to illumination conditions ) In the second instance the stains and patches would appear exactly and only at the end where I let the emulsion drip after coating, at that point the population of silver halide is also uneven and catastrophically denser.
To solve this problem and produce permanent images, I would have to brush coat the emulsion, the strokes would have to leave a thin, very thin, I mean extremely thin and even layer of emulsion on the uneven surface of the plate, but the emulsion would also have to be special. It would have to dry fast so it would not drip and also it would have to have an exceptionally great covering power to allow me to brush so thin.
To that effect I prepared CLEAN and FRESH CHLORO-BROMIDE emulsion which is very rapid, has a warm tone great covering power ( see chapter 8) also added the ethyl alcohol in the composition below to speed up cold air drying of the thin brushed layer. Besides those valuable tools I would also have to avoid leaving local pockets of emulsion on the plate's surface.
Any too thick remains of emulsions were wiped even or off by the brush itself.
I gave all the plates 3 thin coats drying each coat before applying the next.
I had to be sure that the thin and even layers of emulsion left would fix perfectly. That was about 25 years ago, and judging by the good condition of the plates today, I was right ! to eliminate the diffusion of the proyected negative image on the surface of the porcelain sustrate i added to the emulsion corn starch thus;
Liquid Silver Emulsion ...................................100 ml
Ethyl alcohol...................................................10 ml
Powdered corn starch...................................1 gram
 PROCESSING:
To keep the Purest whites on the final image The stains we have to struggle against , are listed below:
A ) developer stains
B ) Thiosulfate stains (its double salts)
C ) The Natural Gelatin coloration (pale yellow)
D ) The stain or color of the varnish used to protect the final image
E ) safelight fog , the slightest gray fog will act as a dye mordant to fix developer and sulphur stains. Fortunately we do not have to deal with support stains because glazed ceramics are absolutely inert and permanent. Stain Resistant Developer I Worked out this developer for Chloride emulsion and is also good for other emulsions in liquid form.
D 72 ( see above) strait solution.... .200 ml
10% solution of citric acid................50 ml
25% solution of kitchen salt............50 ml
This developer is extraordinarily clean. the citrate formed is an antioxidant, the table salt keeps the whites from being reduced. just because it keeps colorless, Do not overwork it. the mixture keeps well for a long time. kodak Dektol, Agfa's Newtol or ilford's Bromophen or any other good paper developer can be used.
Do not overdevelop. For all paper used diluted with 2 parts water. Developing Time at 20c ( 68 f ) for ammoniacal bromide Emulsion # 1: 1.5 minutes For Cloro-bromide Emulsions # 2 and # 3: 45 - 60 seconds. For Pure Chloride emulsions # 4, #5 and # 6: 30- 45 seconds.
Against Thiosulfate Stains After the developer, rinse rapidly in plain water, transfer to a stop bath of O.5% acetic acid for 20-30 seconds rinse rapidly in plain water, place in fixer bath ( with or without hardener) for 5min, agitate frequently. transfer now to a FRESH UNUSED BATH OF FIXER for 5 minutes.( Capital Importance
that the last bath be fresh and unused ) agitate frequently. -rinse rapidly and - immerse gently in sodium carbonate bath of 1% strength for 30 seconds.
( if your emulsion can not stand it, omit it ) - wash gently, each piece in its individual tray for about 30 minutes. Do not wash violently because if you have not used a first class substrate to hold the emulsion, it may come off . be very careful washing. - wipe off excess of water gently with pure filter paper like the one used to filter coffee. and le it dry.
Against The Natural yellow Color of the Emulsion Gelatin
-Do not dilute your emulsion with gelatin. the normal ratio silver/gelatin for positive bromide or cloro-bromide emulsions is silver nitrate 1 part, gelatine: 4 parts, gelatine can even be lower for to 2 parts for richer blacks. silver chloride emulsions can stand gelatine up to 8 parts per each gram of silver nitrate, but no more. Do not coat thicker than necessary for example, for a tile or glass 6x6 inches:
5ml of liquid silver emulsion is for superb blacks enough. If you use 10 ml, drying time will be prolonged 100%, more developer and thiosulfate will be absorbed also by about 100%, and the natural optical yellow density of the gelatin itself will also increase 100%.
 Against Safe Light Fog Stain
The minimum of silver gray fog will degrade the whites because often it will act as magnet to precipitate and anchor oxidation and sulphur yellow, light cream, or orange stains. -
shade your work during developing and test your safelight often. - also test you liquid silver emulsion. It may have developed an important amount of fog in just 24 hours while in liquid form, particularly if you have heated it (ripen) for too long or went too hot (over 50c) - emulsion may be in the brink of fog because of inadequate storage conditions in store shelf. This will never happen when you make your own emulsions.
Acrylic Varnish Overcoat
the Great Advantage of acrylic lacquers or varnishes is its great resistance to discoloration or yellowing. But even Acrylics ( some types) when coated too thick will show a slight pale yellow cast overtime. They do not, as rule, adhere so good to gelatin, as oils do. i will only mention one of the acrylics I have tested and just + it is available everywhere.
This is " Krylon " clear coat for photographs. its adhesion to gelatin is not great, but it will not peel off by itself. it is acceptable. (recommended) no adverse effects coated directly on the silver image.
Even after many years, the coated layer can be scratched if not cleaned with care, But its strongest point is its great resistance to yellowing. It is extraordinary indeed. Its other bad point is its terrible smell when sprayed from the can, it has to be done outdoors. spray it very thin. do not over do it . But Before, for extreme permanence, coat the silver image first with plain colorless gelatin solutions as described above for the oil varnish.

A bisphenol crossed with a polyamide
is probably the best over coat for silver gelatin images. it does not attack the silver image, it adheres to gelatin in an incredible manner.
it can not be scratched with the finger nail when finally dried, and in thin layers does not yellow, It has the brilliance of glass.
but is not available everywhere and is not as easy to use. Part A must be mixed with part B, right before use. the mixture does not keep. Must be mentioned for the record.
ARCHIVAL SILVER IMAGES ON GLASS
Silver Images on glass are very easy to make archival, coat the processed and dried silver image with a 10% colorless plain gelatin solution and dry it thoroughly, then just frame the silver image in contact with a glass of the same size.
You can apply hot silicone to the edges of the glass to seal all entrance of air and water.
image life expectancy of a well fixed and washed silver image so treated should be well beyond 200 years.

COSTA RICA © 2025, saul bolaños
CAFEDESAUL@GMAIL.COM